

Right Under the Germans’ Noses
While Lofty swept the beam of his lamp along the walls of the cavity, Jim was intrigued by a number carved into the chalk. The date 1314 stood out clearly, and the sapper wondered what could have happened in that year.[1] As he caught up with his comrades, Jim was struck by the fascinating sight of a vast chamber supported by thick, square limestone pillars. More than twenty metres beneath the city of Arras, the air was fairly cool. Water trickled down the walls. In places, large blocks had broken loose from the ceiling. Farther on, other fragments threatened to fall. Above the tunnellers, a circular shaft appeared, its top carefully filled in. This access to the surface had been used in the Middle Ages, when quarrymen extracted from the very ground the stone used to build structures. The “beds”, that is, the blocks of limestone, were hauled out to be brought up either rough or already cut to size. Depending on circumstances, the workers laid out a supported route, reinforced here and there by pillars, and when a seam was exhausted, they worked in the same way in another spot. All this work, which continued until the eighteenth century, created many isolated cavities—sometimes quite low and narrow, sometimes made up of high, spacious chambers.
Already at the start of the war, the inhabitants of Arras took refuge in the cellars of the houses that had them, especially around the Grand Place and the Petite Place, as well as in the adjoining streets. These makeshift shelters later took in French soldiers, who also settled into deeper cavities. The French army tried very early on to locate and reclaim other underground spaces. Old extraction quarries were thus discovered beneath the Bapaume road, east of the city. When the British relieved the French troops at Arras in February 1916, they reused these shelters. However, it was not until the beginning of autumn that a growing rumour revealed the existence of underground quarries beneath the city itself. The task of searching for these cavities fell to the New Zealand Tunnelling Company. Jim and his comrades’ efforts were rewarded by the discovery of several quarries beneath two major communication routes to the front east of the city centre: one under the Cambrai road, in the Saint-Sauveur suburb, and the second, farther south, under the Bapaume road, in the Ronville suburb (Map 8). This discovery upended the British plans for an offensive east of Arras at the end of October 1916.[2]
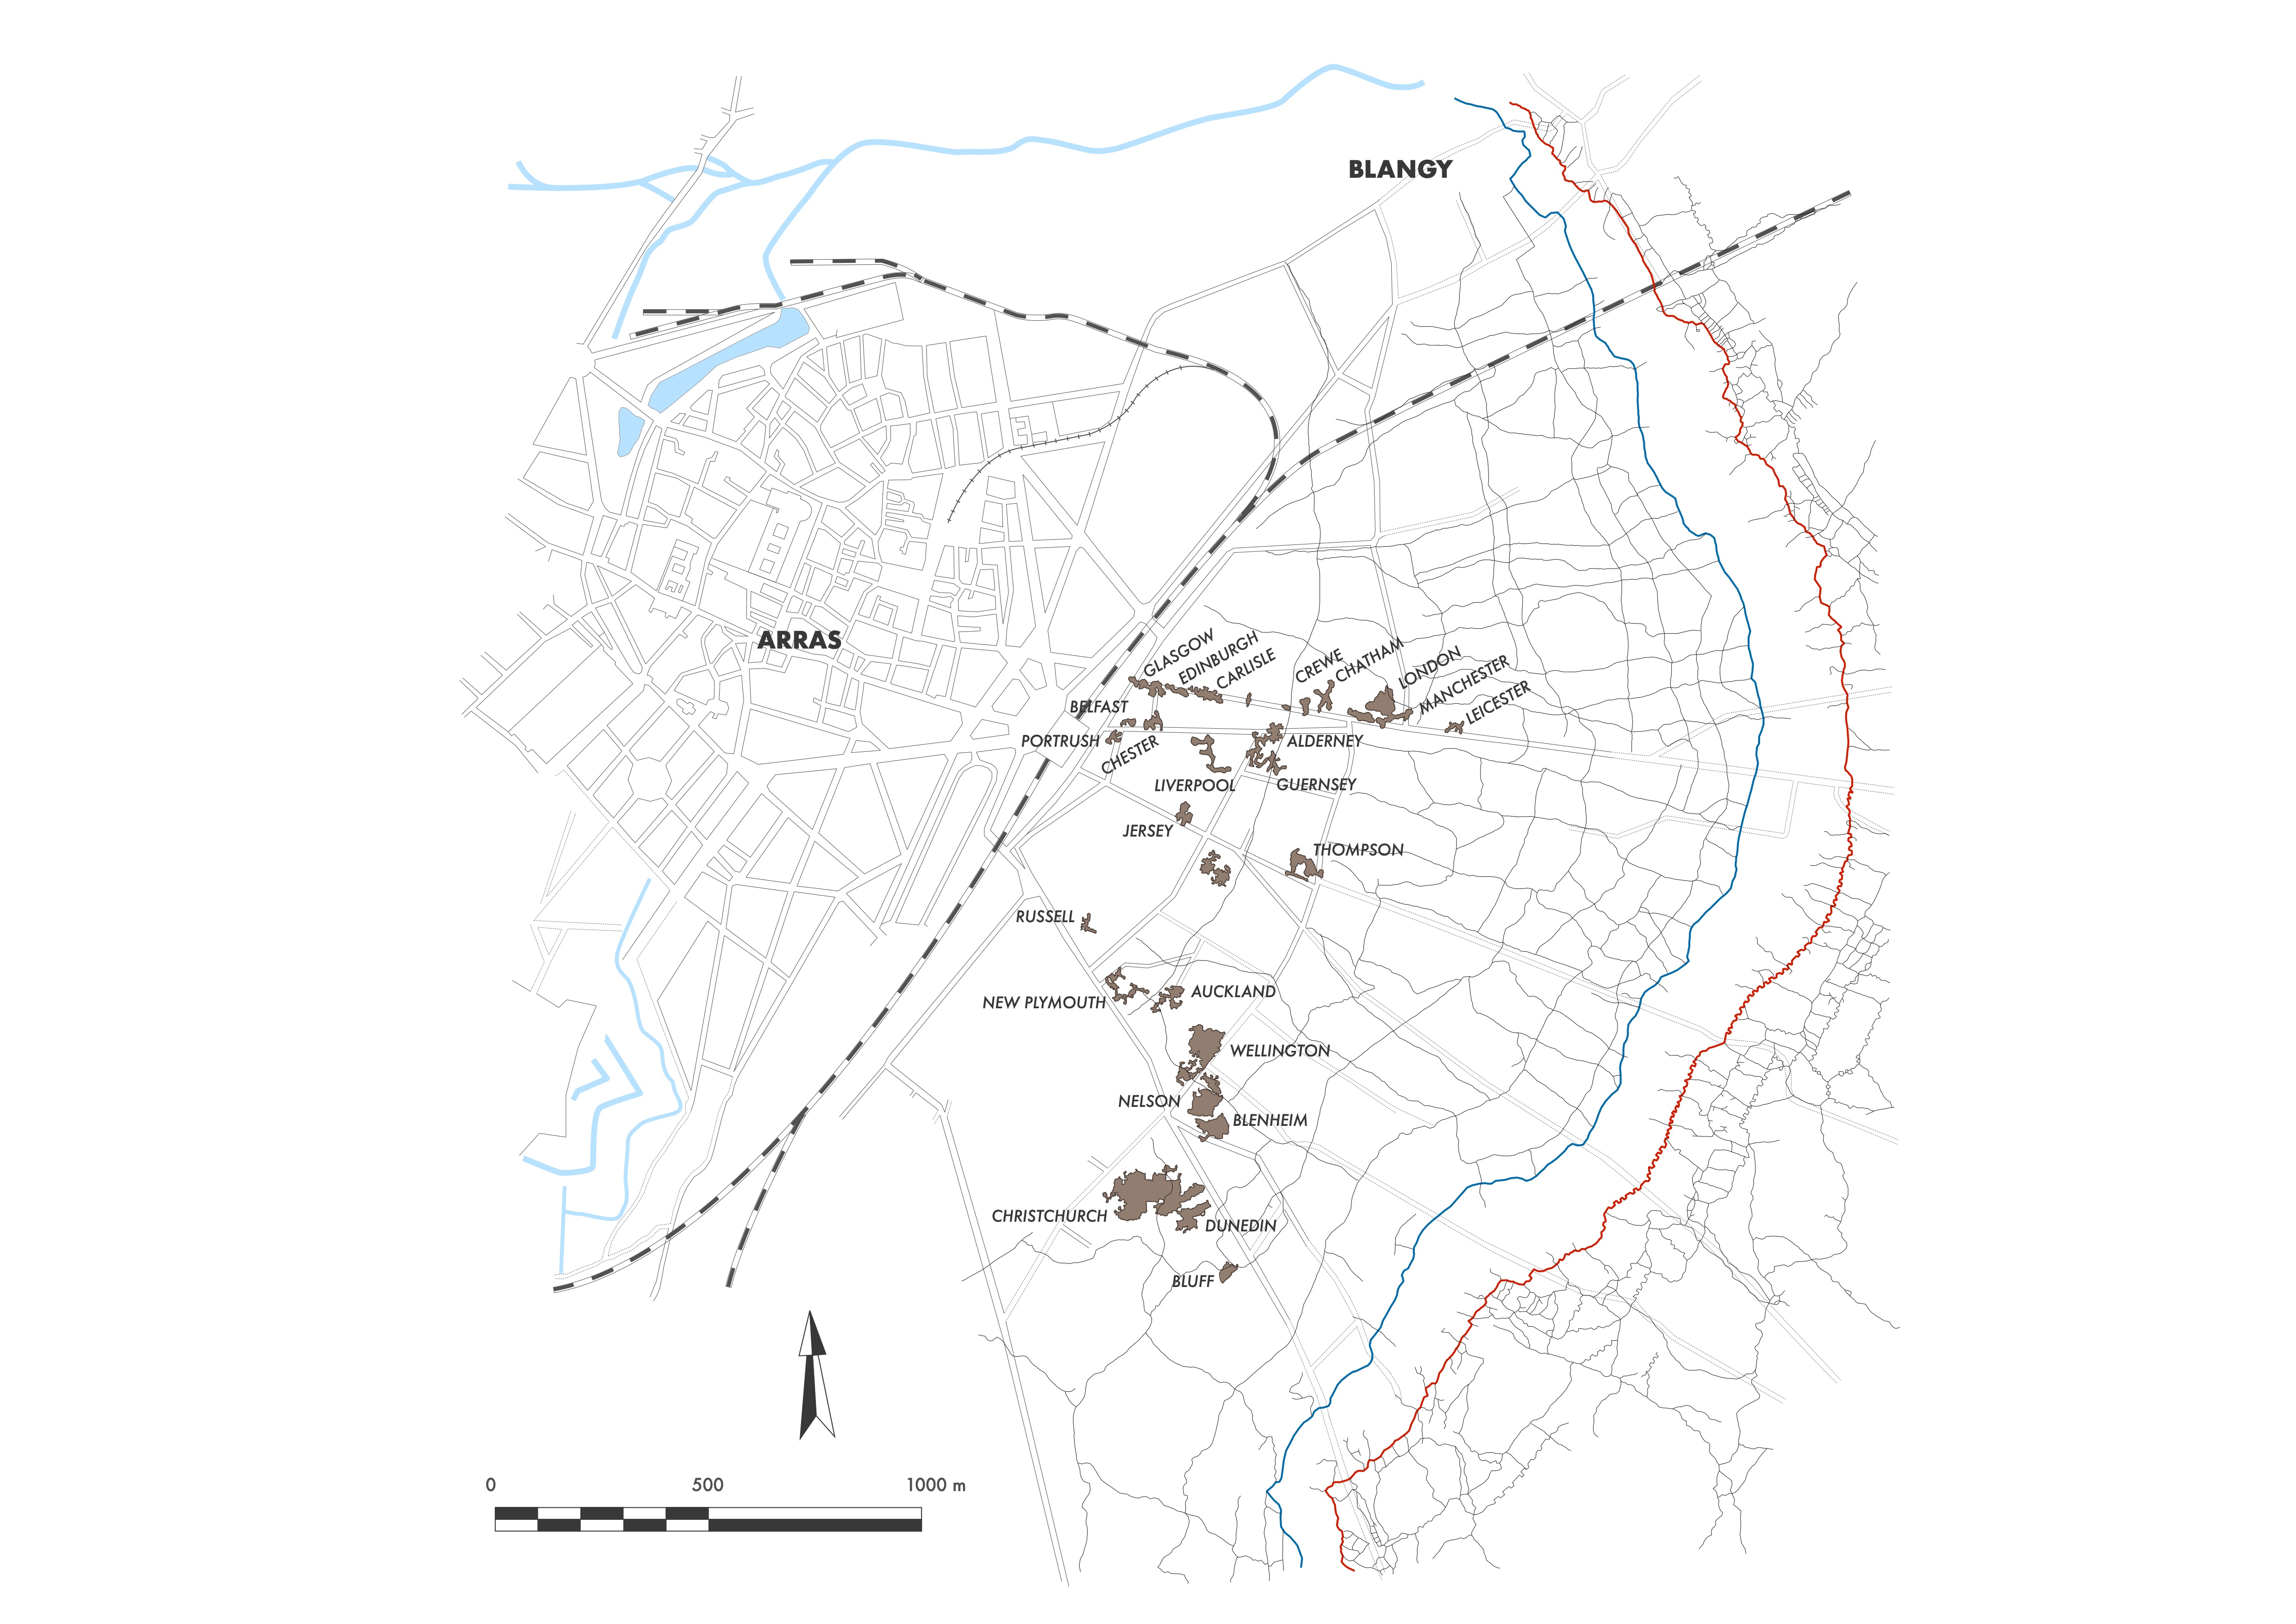
The original plan called for the use of Russian saps: narrow tunnels dug just a few centimetres below the surface of no man’s land and emerging in front of the enemy lines. On the day of the assault, troops were to enter these galleries and burst out in front of the opposing trenches. The New Zealanders had already begun work in sectors H and I when the first underground quarries were discovered. The Russian saps were quickly abandoned, and the cavities gave rise to a more ambitious plan to break the German front line, barely three kilometres east of the city centre. The British Army planned to use the closeness of these quarries to the front to house its soldiers and, above all, to create two immense underground passages, directly inspired by Russian saps, to reach the German front. The work was entrusted to two tunnelling companies. The New Zealand unit, numbering a little over 300 men, was tasked with linking up the quarries on the Ronville side, while two sections—about 140 men—of the 184th Tunnelling Company were to carry out the linking work on the Saint-Sauveur side. The attack planned by the British at Arras soon became part of preparations for a larger Allied offensive to be launched in early 1917. General Haig, commander-in-chief of the British armies, and his French counterpart, General Joffre, agreed on its necessity during an inter-Allied meeting at the Hôtel du Grand Condé in Chantilly on 15 November 1916.[3] But Joffre’s removal and his replacement by General Robert Nivelle at the end of December radically changed the plan of attack. The British troops saw their role reduced. They would carry out only a diversionary offensive in the spring of 1917. This action was intended to draw German Army reserves away from the Aisne, enabling the French to attack between Soissons and Reims, thereby making it easier to break through the enemy lines.[4]
Jim’s team had not gone down, on the morning of 16 November 1916, into one of the quarries beneath the Bapaume road to play at being amateur cavers. Like the other teams of Section 1, they were to open the cavities up to the surface and create several access routes to make movement underground easier. The men were sheltered below ground while the first snow began to fall above. On 17 November, the unit received a small group from the 2nd reinforcement draft of New Zealand tunnellers, who had arrived in France at the beginning of the month and were billeted at the Étaples camp. These were the very first New Zealanders recruited after the departure of the main body and the 1st reinforcement in December 1915. The next day, 52 more men arrived to fill out the company’s ranks. The arrival of these recruits was a chance for the men of the main body and the 1st reinforcement—who had been away for nearly a year—to get fresh news from home. It also gave the company a new surge of energy. According to the officers, the newcomers were good miners.[5] Jim thought so too, having welcomed into his team a bloke from the West Coast of the South Island, nicknamed Sharkey.[6] The men worked hard at their new mission, and on 22 November they drove nearly 73 metres of tunnels with the help of drills and explosive charges—the best advance achieved so far.[7] The record fell again the very next day. The tunnellers cut a few more centimetres into the limestone. The first galleries began to take shape.
Beneath the Saint-Sauveur suburb, the 2nd and 4th Sections of the 184th Tunnelling Company did not begin work until 28 November. The full unit had taken over from the New Zealanders in the underground fighting at Chantecler. It could not assign two of its sections to connecting the quarries until late November, while it organised its operations north of Arras. Half as numerous as their counterparts from the Antipodes, the British were given responsibility for linking the network made up of the smallest underground quarries. The Saint-Sauveur system consisted of a series of small cavities following the line of the Cambrai road, whereas on the Ronville side the quarries were much larger but also farther apart.[8] Although the tunnellers of the two units worked independently, they adopted the same working rhythm. The two sections of the British company switched to the New Zealanders’ three-shift system.[9] They all used the same gallery dimensions, nearly 2 metres high and a little over 1.20 metres wide. No sooner had the British tunnellers arrived in Arras than they discovered a new quarry close to the front. The next day, one of their tunnels suddenly broke into an unrecorded cavity, saving them almost 30 metres of digging. Nevertheless, another quarry—too shallow and posing a risk in the event of bombardment—was abandoned, and a new tunnel had to be driven to reach the next cavity.
As in underground warfare, volunteer soldiers from the regiments holding the sector joined the tunnelling teams. Many were “Bantam”, a nickname given to soldiers whose height was below the standard required in the British Army—men the tunnellers had already encountered in the Chantecler trenches. This time, most of the Bantam came from the 17th West Yorkshire Regiment. Tempted by the promise of a double daily ration, many infantrymen volunteered for what was supposed to be a top-secret digging job. The volunteers were selected using their pay book, which had to state the occupation of miner. Once assigned to the tunnellers, however, the men never received the extra ration they had been promised. The New Zealanders—who had already witnessed these soldiers’ poor living conditions at Chantecler—began an unofficial strike in mid-December, just as they were setting a new digging record of more than 100 metres per day. Under the influence of the trade unionists in the company, they gradually slowed their pace, advancing only 80 metres in a day.[10] After a few days of digging at this easier rhythm, the British officers gave in to the New Zealanders’ demand. More than living conditions, it was the officers’ contempt for their own soldiers that outraged Jim and his companions. On several occasions, Jim noted that the soldiers due to work with his night team were brought in well ahead of time by their officer.[11] The officer left them waiting in the cold while he went off elsewhere for the evening. To show their dissatisfaction, Jim—like other tunnellers—picked up the bad habit of no longer saluting the Bantams' officers. General Allenby, commander-in-chief of all troops in the Arras sector, immediately lodged a complaint with Major Duigan, accusing him of lax discipline in his ranks. Duigan gave him a choice: discipline or work. But if Allenby chose discipline, digging output would fall further and the quarries would not be ready in time. The general gave way.
A group of experienced New Zealanders also joined the tunnellers as the two immense tunnels took shape towards the front. On 9 December, a detachment of 43 men from the Māori Pioneer Battalion arrived in Arras under the authority of Lieutenant Delautour.[12] The Māori were given the task of levelling the floor of the underground chambers. They quickly became great favourites. Hard workers, they provided a labour force that immediately proved indispensable. Always in good spirits, they made everyone laugh and were deeply missed when they were recalled to their unit. New Zealanders of European origin and those of Māori origin quickly grew close, often spending their rest time together in Arras cellars, where bottles of wine and champagne—found by chance or bought for five francs in the city’s small shops—delighted the men. On other occasions they gathered at the pioneers’ quarters, set up in a former estaminet, where the wreck of a piano became the Māori’s favourite attraction.[13] Relations were even better when it came to stealing wood from the British Royal Engineers. The large number of underground works had created a shortage, and the Māori had a gift for acquiring timber with remarkable efficiency. When one of them was caught red-handed by an angry English officer, the Māori would pretend not to understand the language of Shakespeare.[14] The New Zealand tunnellers also suffered from these acts of pilfering. One officer in the unit had stockpiled a fine pile of planks. The wood was lowered carefully down a shaft, but when the officer came down in turn, he found not the slightest trace of it. Alone beneath the shaft, he stood puzzled by its mysterious disappearance. A few Māori working there had seen the timber come down. At once they had called their comrades to collect it. By the time the officer reached the quarry, the Māori had already put it to their own use.[15]
By the end of December, the New Zealanders were digging with such determination that the Ronville network was practically complete. Their bodies were being pushed to the limit. Jim’s back pains returned, yet he carried on without complaint. No rest was granted for the end-of-year holidays. Christmas and New Year were spent underground. The tunnellers began installing cables to supply the caverns with electricity. Heavy rain fell over Arras. While the New Zealanders on the Ronville side were sheltered, the quarries on the Saint-Sauveur side, much less deep, were soon flooded. Water running down from the surface caused parts of the roofs of the galleries and chambers to collapse. The men of the 184th Tunnelling Company had to continue their work with great caution. At the very beginning of January 1917, the New Zealanders’ system was ready, while Major Duigan—called to another assignment—handed command over to Captain Vickerman. The connection with the sewers had already begun, but many tasks delayed the digging. The nearly 2.3 kilometres of galleries that had been driven created a natural airflow which triggered falling stones and repeated collapses. Jim and Lofty’s team had to clear the damage and shore up the most fragile sections.[16] The rest of the men relieved the British tunnellers in an isolated chamber at the corner of Saint-Quentin and du Temple streets (Map 8). This quarry, at the initiative of the medical corps colonel A. G. Thompson, was intended to become an advanced hospital. On 22 January, the men of the 184th Tunnelling Company handed over the Saint-Sauveur system—finished quickly—to the New Zealand unit. Shorter though it was, it had still required the excavation of two kilometres of tunnels. The British work did not satisfy the New Zealanders, who had to redo the shoring in the quarries and finish connecting the underground complex to the sewers.
Whether beneath the Saint-Sauveur suburb or beneath the Ronville district, the network had become a true labyrinth. The officers of the New Zealand company decided to imitate their counterparts in the 184th Tunnelling Company, who had given British city names to each of the cavities beneath Saint-Sauveur.[17] Along the main tunnel were the quarries of Glasgow, Edinburgh, and Carlisle, where the system split in two: one route, made up of the cellars Liverpool, Chester, Belfast, and Portrush, ran back toward the town; the other, consisting of the chambers Crewe, Chatham, Manchester, London, and Leicester, continued toward the front (Map 9). The New Zealanders logically assigned the names of towns from their Dominion. Heading toward the British front line, the system contained nine quarries named as follows: Russell, Auckland, New Plymouth, and Wellington, symbolising the North Island of New Zealand; then Nelson, Blenheim, Christchurch, Dunedin, and Bluff, representing the South Island. Unlike the Saint-Sauveur network, the distribution here followed a geographical order, using the names of towns that make up New Zealand from north to south (Map 9). The names were painted in black directly onto the walls, with arrows added to make navigation easier. Each quarry was also divided into different zones from north to south according to a precise grid, laid out using the chalk pillars that supported the roof. To facilitate the movement of matériel toward the front, a 60-centimetre-gauge railway track was first laid inside the Ronville system, then along the Saint-Sauveur network. Several loading platforms were built at regular intervals to allow the loading and unloading of the small wagons. A line was even installed in the sewers and connected to the other two tracks. As the network was electrified, low-level lighting followed. A successful trial carried out at the beginning of February in the tunnel linking Nelson to Christchurch[18] led to the installation of 1,468 light bulbs in the Ronville network and 324 more in the Saint-Sauveur system. Circulation in the galleries and quarries then became easier. A shortage of electrical cable, however, delayed the completion of the work on the Saint-Sauveur side until the beginning of April.
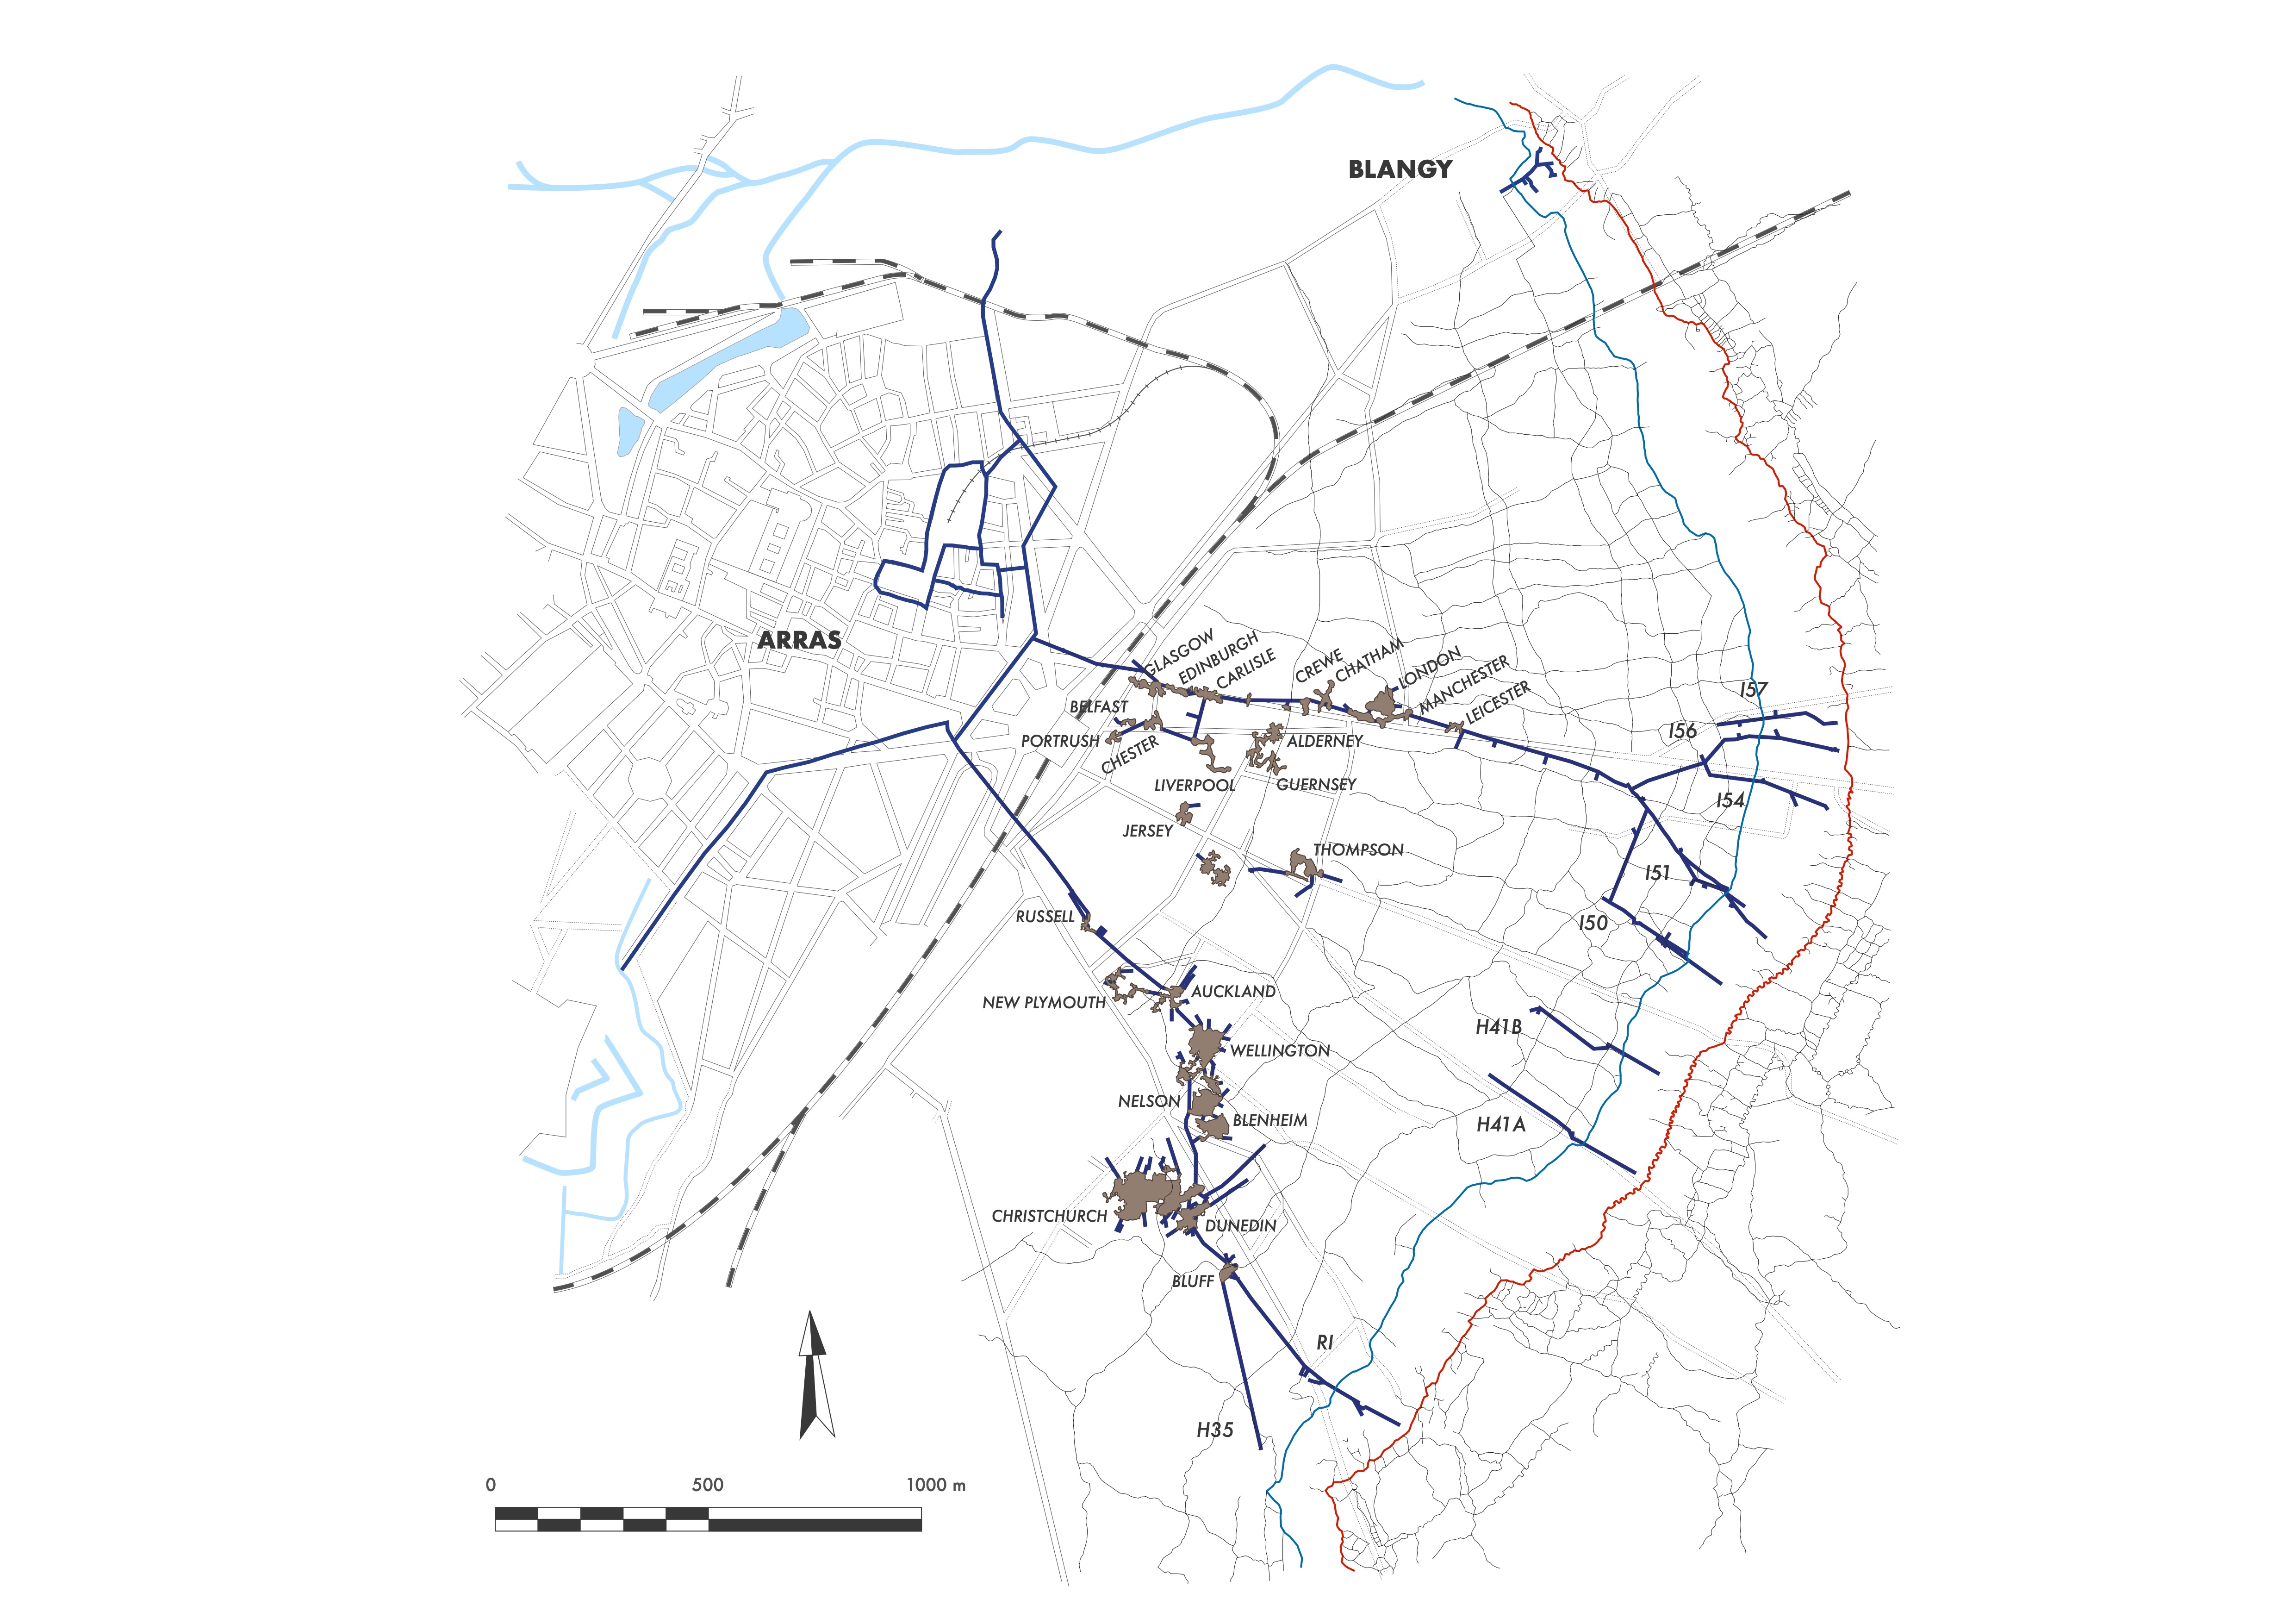
The tunnellers of Section 4 began linking all the cellars of the houses around the Grand Place and the Petite Place on 2 February (Map 9). The Iron Gate, on Rue du Saumon, became the main entrance to the underground system. The men worked without stopping, at a steady pace.[19] Jim was completely exhausted. His back was causing him terrible pain. The sapper finally decided to consult one of the medical staff attached to his unit, Doctor Richards, who examined him and diagnosed a hernia, a diagnosis Jim already knew. He was put on rest and sent to hospital for a few weeks.[20] The work split the company’s manpower. A first group continued the fitting-out of the vast underground complex. A second group had gone to the front line at the exit of the Saint-Sauveur network to prepare the galleries that would run beneath No Man’s Land. Finally, a third group had been redeployed to Blangy, north-east of Arras, to dig, in preparation for the offensive, a communication tunnel toward the German trenches. The section of the front located between the two underground networks, as well as the forward part of the Ronville system, was handed over to the 179th Tunnelling Company on 9 February.
The group of Māori left the tunnellers on 27 February. The day before their departure, British infantry carried out a raid on the front and captured a few enemy soldiers. As the Māori watched the men return, a sergeant brought up a prisoner. The Māori, who until then had never seen a German, approached with great interest. They circled around him with the same attitude as during the haka, the Māori war dance: their eyes widened, their tongues stuck out, and their faces took on expressions meant to inspire fear in the enemy. The tunnelling company’s officers wondered whether this spectacle might be connected to a German communiqué accusing the British of employing cannibal New Zealanders on the front. In any case, the Germans were well informed about the Māori and about a part of their culture that had been widespread in their pre-European society: cannibalism. The British had encountered this practice during the exploration of the South Pacific islands in the eighteenth century. This custom persisted up to the New Zealand Wars (1845–1872), during which the Māori killed and ate their enemies in order to punish them more severely for their defeat.[21] Death was not sufficient in their eyes. They wanted to reduce their adversary to the state of excrement, an ultimate humiliation. But with European domination, these practices were rapidly abandoned and no longer existed by the end of the nineteenth century. These accusations were above all used to demonise the British army.
At the far end of the Saint-Sauveur network, several galleries were being driven that would allow soldiers to reach the enemy trenches on the day of the offensive. From north to south were the Russian saps I56, I54, I51, and I50 (Map 9). Dug only a few metres below the surface, these tunnels were difficult to detect. The German miners in fact believed they were dealing with much deeper mine galleries. As they drew closer to the enemy side, the tunnellers became even more cautious and tried to work as silently as possible. The Germans were active opposite I56 and I50, but could not locate them. On 23 February, they fired shells, one of which landed above I54.[22] The gallery suffered no damage, but the props and wooden coverings were blown apart by the blast. British infantry were sent into an attack three days later between Blangy and the Saint-Sauveur suburb. Although the assault was a success, the Germans took revenge by resuming their bombardments. A trench mortar struck the entrance to I54 and two men were wounded. A lull allowed the tunnellers to begin a new sap, I57, north of I56 (Map 9). British artillery tried to reply to the enemy fire, but made a mistake when a 30-kilogram mortar bomb destroyed I54.[23] The gallery collapsed over a six-metre length, killing an infantryman employed as a fatigue. The Germans did not discover the sap, even though it was now exposed beneath their barbed wire, and they concentrated on mortar fire. One round exploded on the new sap I57, wounding two tunnellers.[24] The New Zealanders found themselves caught between the belligerents in the middle of no man’s land, at the mercy of their actions. On 13 March, the Germans took the British by surprise. They broke into the trenches and carried out a reconnaissance of the entrances leading into the Saint-Sauveur network. Two days later, a new assault gave the Germans the opportunity to place portable mines in the underground access points they had spotted.[25] The entrance to I56 was destroyed. Two other mines that had been thrown into another access point caused no damage. Three other charges were found in a third entrance. Despite these infiltrations into the British trenches, the attack plan was still intact.
However, between 14 and 16 March 1917, the German army carried out a strategic withdrawal to the Hindenburg Line, a fortified trench system located behind the existing front. This pullback jeopardized British plans. The idea for this strong line had emerged during the Battle of the Somme (1 July–18 November 1916). Initially conceived as a security measure, the Hindenburg Line quickly became a strategic fallback position. At that time, German troops were in difficulty on the Somme front. They were no longer in a position to hold their trenches. Although British pressure was less intense and more scattered, the situation remained precarious for the Germans. Rumours of a French offensive in the Aisne grew stronger. The German high command took no chances and ordered the withdrawal. The front line remained unchanged north of Arras, but from the Cambrai road onward it moved farther and farther away from the British trenches.[26] The Germans did not realise they had just disrupted the British plan to launch an attack from beneath Arras. Only one underground network was still usable. With barely a month to go before the offensive, it was a serious blow for the British, who could now advance as far as the former German trenches. The Ronville system no longer allowed troops to emerge in front of enemy trenches, but instead to surface in the new British rear lines.
Chapter 9
The Battle of ArrasNotes
- 1.
Imperial War Museum, Documents.11515, The First World War Memoirs of James Williamson, Part 2, f° 4, “One date I remember was 1314. I thought of some thing that had happened in our own history on that date.”
- 2.
The National Archives United Kingdom, WO 95/407, New Zealand Tunnelling Company War Diary, 9 October 1916, “All going well attack to take place at the end of month.”
- 3.
Peter Barton, Arras. The spring 1917 offensive in panoramas including Vimy Ridge and Bullecourt, London, Constable & Robinson, 2010, p. 33.
- 4.
Ibid., p. 39-40.
- 5.
The National Archives United Kingdom, WO 95/407, War Diary…, op. cit., 4 December 1916, “Reinf. are a good crowd of men.”
- 6.
Imperial War Museum, Documents.11515, The Memoirs of James Williamson…, op. cit., Part 2, f° 1, “When they started the caves job I was put on working in the face with a chap named Sharkey from the West Coast, he was a new arrival. He was a great worker”.
- 7.
The National Archives United Kingdom, WO 95/407, War Diary…, op. cit., 23 November 1916, “Acme drills and explosives being used effectively”.
- 8.
James Campbell Neill, The New Zealand Tunnelling Company, 1915-1919, Auckland, Whitcombe & Tombs, 1922, p. 65, “The Ronville caves were by far the larger, some of them immense caverns hundreds of feet in diameter and twenty to forty feet high.”
- 9.
Library of the British Royal Engineers, 184th Tunnelling Company War Diary, 29 November 1916, “Nos II and IV Sections are being worked in three reliefs instead 4 while the cave connecting scheme lasts”
- 10.
Imperial War Museum, Documents.11515, The Memoirs of James Williamson…, op. cit., Part 2, f° 3, “… the footage average had dropped from about four feet to one foot six.”
- 11.
Ibid.
- 12.
This battalion was made up mainly of Māori and peoples from the Pacific islands. Leaving Wellington on 13 February 1915, the Māori contingent sailed for Egypt and was sent to Gallipoli in July 1915. In February 1916, the battalion was reorganized following the evacuation of the Dardanelles Strait in December 1915. The battalion was then part of the New Zealand Division. In April 1916, the Māori were sent to northern France—first to Armentières, then to the Somme in August 1916. For more information, see Christopher Pugsley, Te Hokowhitu A Tu, The Maori Pioneer Battalion in the First World War, Auckland, Reed Books, 1994, 147 p.
- 13.
James Campbell Neill, The New Zealand Tunnelling Company…, op. cit., p. 70.
- 14.
Ibid., p. 70-71.
- 15.
Ibid.
- 16.
Ibid., p. 65.
- 17.
Library of the British Royal Engineers, 184th War Diary…, op. cit., 24 December 1916, “The Caves of the St. Sauveur tunnel have been named after towns in the United Kingdom.”
- 18.
The National Archives United Kingdom, WO 95/407, War Diary…, op. cit., 6 February 1917, “A trial run was made today on gallery lights Nelson to Christchurch Caves.”
- 19.
Ibid., 4 February 1917, “Work progressing steadily.”
- 20.
Imperial War Museum, Documents.11515, The Memoirs of James Williamson…, op. cit., Part 2, f° 4, “I did not stay long on that job as I generally kept getting worse and had several of fainting turns, so Dr Richards sent me to a clearing station, that was some time in February.”
- 21.
For more information, see Paul Moon, This Horrid Practice: The Myth and Reality of Traditional Maori Cannibalism, Auckland, Penguin, 2008, 304 p.
- 22.
The National Archives United Kingdom, WO 95/407, War Diary…, op. cit., 23 February 1917, “A large Minnenwerfer landed on I.54 sap.”
- 23.
Ibid., 2 March 1917.
- 24.
Ibid., “I.57.a crumped today by ‘Minnie’ - two of our men hurt.”
- 25.
Ibid., 15 March 1917, “At 5-30 a.m. Boche raided at I.56 and blew in i entrance to I.56. Also dropped 2 bombs down another entrance. Very little damage […] 3 Huns portable charges found near blown in entrance.”
- 26.
The National Archives United Kingdom, WO 153/906, Plans of the cellars and underground passages of Arras, surveyed by the men of the British Royal Engineers of the Third Army, 1917–1918. Plan of the quarries and underground passages of Arras, indicating the movements of the front line between February and March 1917.
How to cite this page
Anthony Byledbal, “Chapter 8: Right Under the Germans’ Noses”, in Kiwis Dig Tunnels Too, New Zealand Tunnellers, 2017. Available at: